STAC Entries Tool
The STAC Entries tool enables you to create STAC Collections, Items, and Assets using flexible JSON files with links to your geospatial assets. The STAC Entries tool in the workspace admin enables users with editor or admin permissions to create and manage new raster layers on the Navigator platform.
To create layers in Navigator, geospatial data in Cloud Optimized GeoTIFF (COG) the format must be indexed in STAC to connect data to backend platform services.
Tip
If rasters have a publicly available tiling service, such as Google Earth Engine or the Planetary Computer, they can be loaded in Navigator without STAC. Vector datasets are always rendered without STAC. Use ESRI to connect vector datasets.
What is STAC?
“The STAC Specification is a common language to describe geospatial information, so it can more easily be worked with, indexed, and discovered. Users of spatial temporal data are often burdened with building unique pipelines for each different Collection of data they consume. The STAC community has defined this specification to remove this complexity and spur common tooling.” See the STAC spec website for more background on STAC.”
The STAC website outlines the STAC Specification. There are four specifications that work together to make up the STAC Spec: STAC Items, Collections, Catalogs, and STAC API. Together they create a standard way to expose spatiotemporal data to people and services such as Navigator (STAC Spec, 2022).
Step 1. Create Valid Cloud Optimized GeoTIFFs (COGs)
Layers on Navigator must be stored in Cloud Optimized GeoTIFF (COG) format. A Cloud Optimized GeoTIFF (COG) is a GeoTIFF file, aimed at being hosted on an HTTP file server, with an internal organization that enables more efficient workflows on the cloud.
For more information about COG files, including troubleshooting COG creation, see Troubleshooting COG files
Tip
Files that are not in a valid COG format are not accepted into the STAC Catalog by the STAC Entries tool.
To transform your GeoTIFF into a COG:
Clear all formatting. Make sure to explicitly set BIGTIFF=YES if uncompressed file is >4GB, the ‘IF_NEEDED’ option won’t work in this case.
gdal_translate -of GTiff -co TILED=NO -co COMPRESS=NONE -co BIGTIFF=YES $src $src_reset
Use the GDAL COG driver (specified with -of COG) to make the COG. Set the OVERVIEW_RESAMPLING method to NEAREST for categorical data, and AVERAGE for continuous data. (-co OVERVIEW_RESAMPLING NEAREST). Again, explicitly set BIGTIFF if file > 4GB.
gdal_translate -of COG -co COMPRESS=DEFLATE -co OVERVIEW_RESAMPLING=AVERAGE -co BIGTIFF=YES src_tif dst_cog
More background:
CO OVERVIEW_RESAMPLINGneeds to be set based on the type of data (with-of COGthis will default toCUBICunless there’s an internal colormap, then it isNEAREST). SetMETHODtoNEARESTfor categorical data, andAVERAGEfor continuous data. (-co OVERVIEW_RESAMPLING NEAREST)Add
-co BIGTIFF YESif input filesize > 4GB. Do not rely on-co BIGTIFF IF_NEEDED.Try
-co NUM_THREADS=ALL_CPUSto enable multithreading compression and overviews.If needed, sometimes
DEFLATEcan be faster for decompressing/serving tiles.
Step 2. Upload COG Files to Azure
Next, upload the COG file to a container in Azure using azcopy or the Microsoft Storage Explorer application . In order to access an Impact Observatory hosted Azure container you neeed a Shared Access Signature (SAS) key. Please email IO if you need a SAS key. Once you have valid COG files and a SAS key, the command line can be used to upload files to Azure. if needed, download azcopy. For more information see, the azcopy documentation.
With the azcopy copy command, use the following syntax to upload the file(s)to an Azure container:
azcopy copy '<local-file-path>' 'https://<storage-account-name>.<blob or dfs>.core.windows.net/<container-name>/<blob-name>'
Step 3. Use the STAC Entries Tool to Create a STAC Collection
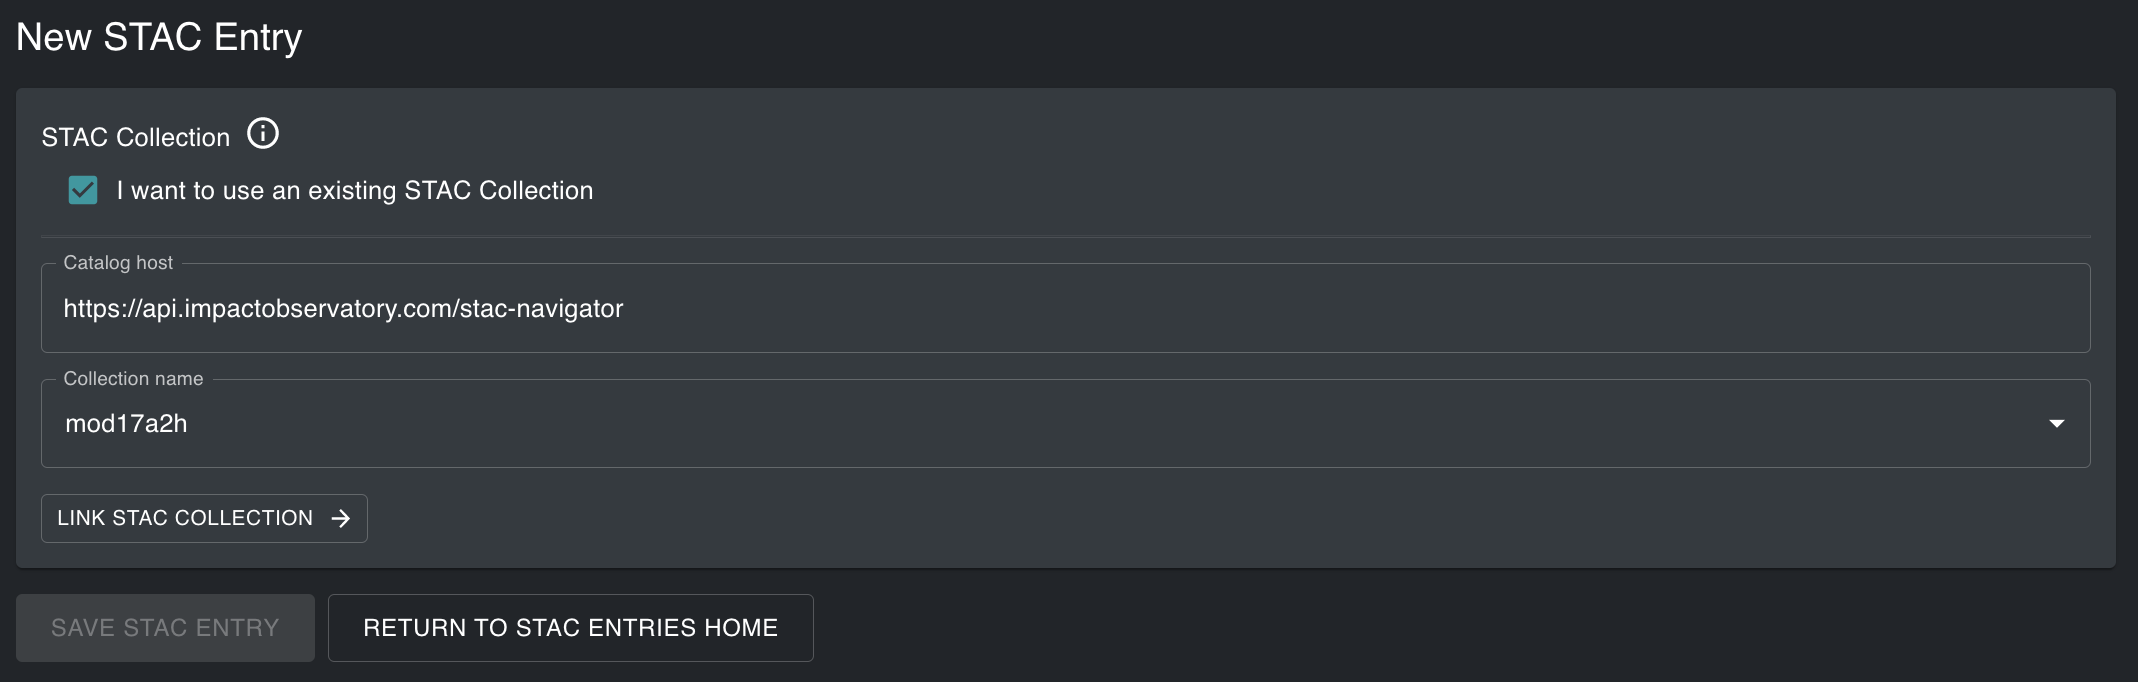
Once your data is in Azure, use the STAC Entries tool to create STAC infrastructure to enable your data to become a layer. You must have editor or admin permissions to access the STAC Entries tool in Navigator. Open the admin for your workspace. From the Home dropdown menu select STAC Entries, then Create New STAC Entry.
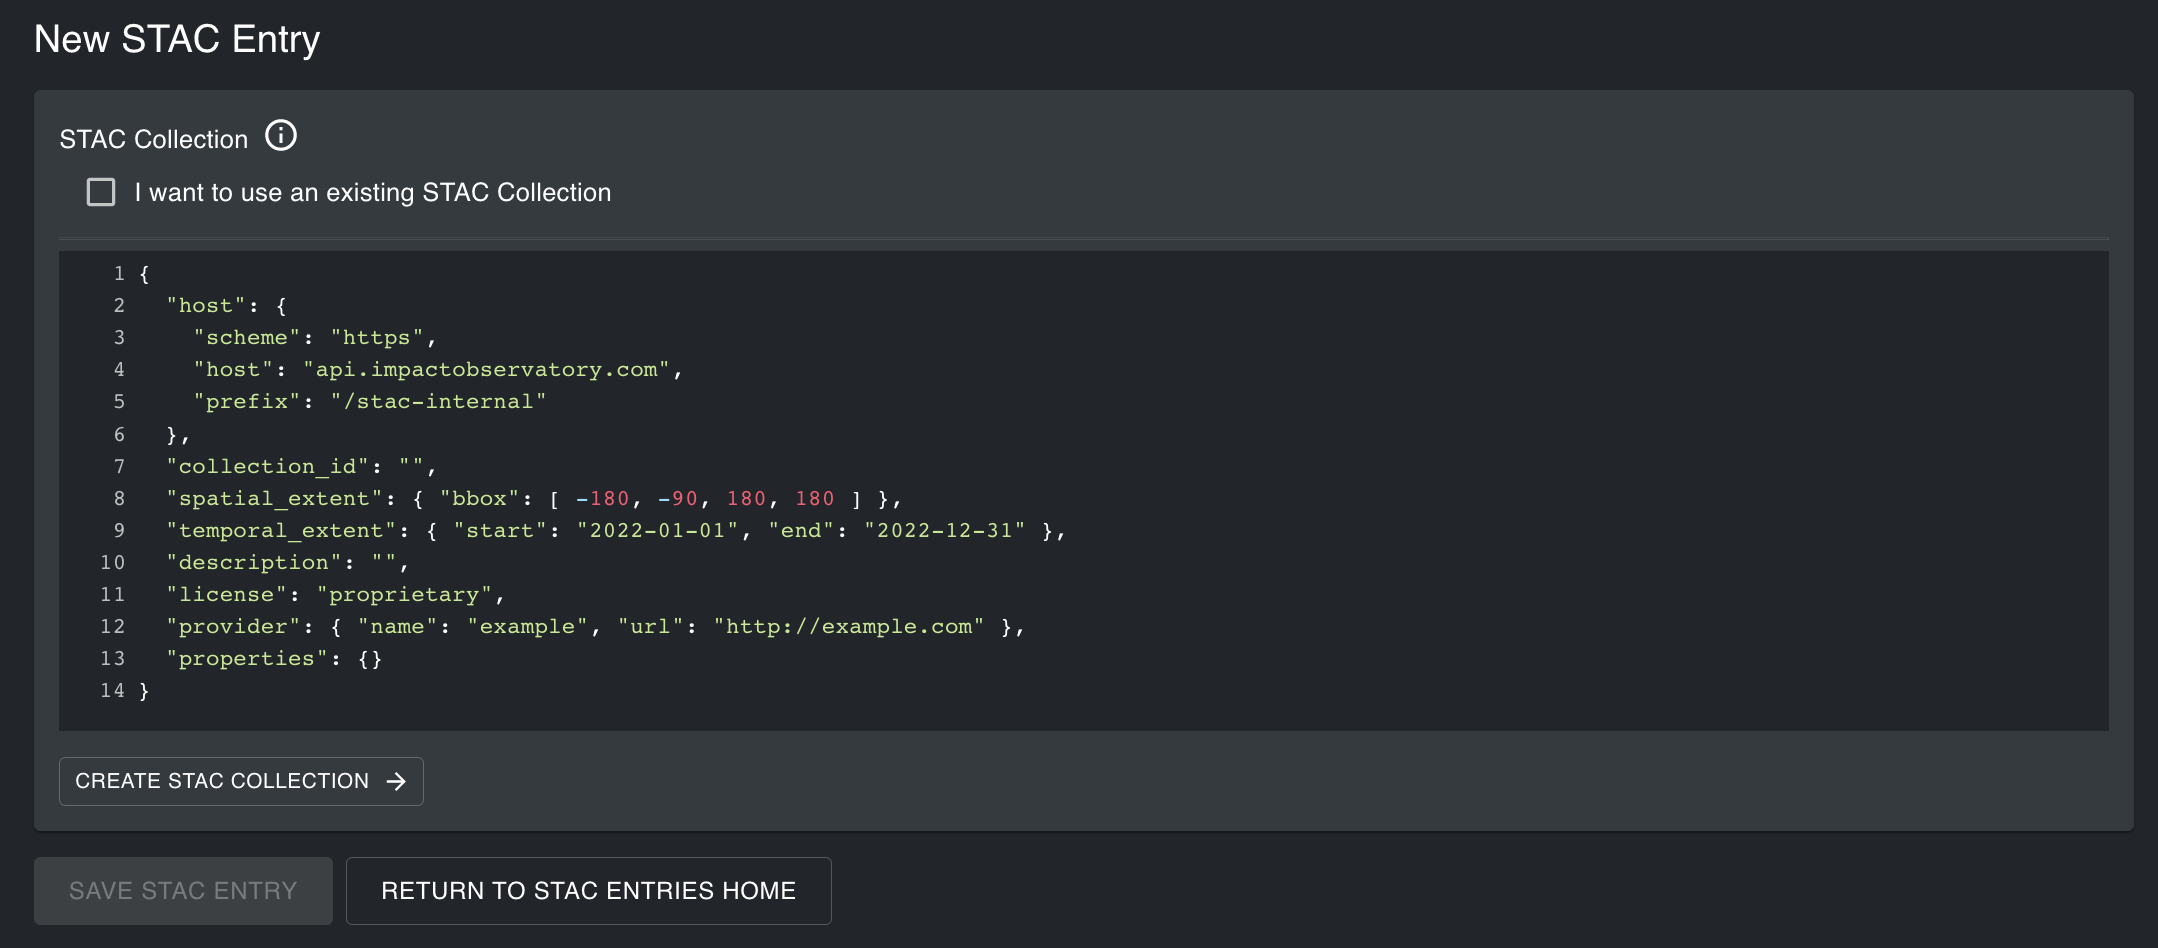
The STAC Entries tool contains two Graphical User Interfaces (GUIs) to create JSON files with links to your files in Azure. You need to replace fields in the template JSON provided with the relevant metadata for your COG files. The first GUI contains a template to create a new STAC Collection. If you have an existing STAC Collection you would like to add data to, check I want to use an existing STAC Collection. Then provide the exact name of your STAC Collection and select Link to STAC Collection.
If your data is not related to any existing STAC Collections you need to create a new STAC Collection. Begin by typing in the GUI to edit the JSON. Use the template provided to replace the required STAC properties.
{
  "host": { "host": "io-stac-navigator.impactobservatory.com" },
  "collection_id": "",
  "spatial_extent": { "bbox": [ -180, -90, 180, 180 ] },
  "temporal_extent": { "start": "2022-01-01", "end": "2022-12-31" },
  "description": "",
  "license": "proprietary",
  "provider": { "name": "example", "url": "http://example.com" },
  "properties": {}
}
Tip
- STAC Collection Organization
Keep in mind a STAC Collection should be built around distinct methods/products. Use different Collections if there’s a clear logical difference in the data for example, different sources, methods, or versions of a dataset. Properties should apply to all of the COG files that will be in the STAC Collection. If some data have different properties, that is a good sign to use separate STAC Collections for each dataset.
host The host is the URL to the destination STAC Catalog. The default should
be set to the default: api.impactobservatory.com/stac-navigator
collection_id The Collection ID is the name of the Collection. Use a short descriptive name of your choosing. Do not use spatially or temporally-specific information in Collection name. Do not use spaces.
spatial_extent The spatial extent is a geographic bounding box or the
smallest rectangle that will completely enclose all data that will be in the
Collection. Use the format MaxX, MaxY, MinX, and MinY. The bounding box [-180.0,
-90.0, 180.0, 90.0] is used for a global dataset.
Tip
View the properties of a COG file in QGIS to copy and paste the bounding box.
temporal_extent The date range for the Collection. Replace with dates that
encompass the entire time span of all the data that will be in the Collection.
If there are multiple years of data, the start date should be the oldest date
and the end date should be the most recent date. Use a full year for annual
data, for example, if the data is from 2020 only, replace the dates with
2020-01-01 and 2021-12-31.
description Required to include a description of all the data in the
Collection.
license Required to provide a license for the data in the Collection.
provider Provide the name and URL of your organization, the
provider, and/or the source.
properties Optional to create custom properties to add to the Collection.
For example, you could create 'misc_field_1' with a property to store the
styling information, such as 'io:style': categorical.
Once the STAC properties are defined, click Create STAC Collection.
Step 4. Create STAC Item(s) and Asset(s)
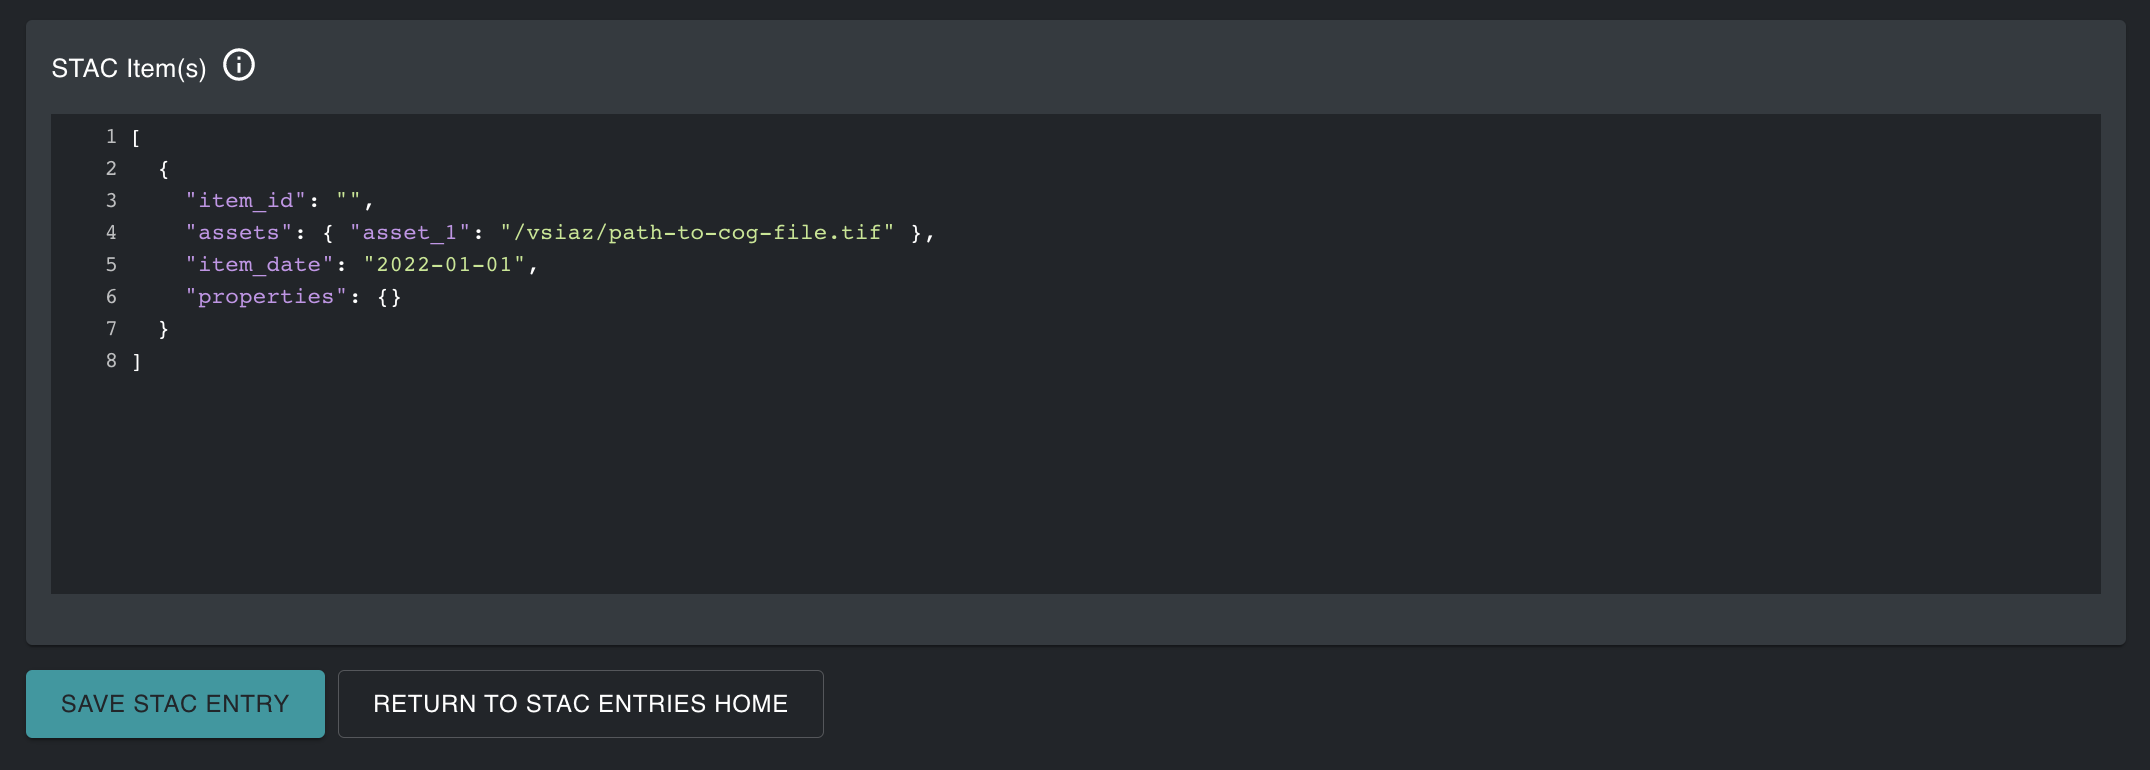
The second GUI in the STAC Entires tool contains a template JSON to create Items and Assets to add to the chosen STAC Collection.
Tip
STAC Item Organization
The number of Items or Assets in your Collection depends on your data’s spatial and temporal variances. You can decide the structure you want to use for the Items and Assets. The general recommendation to organize the structure of your STAC Collection is to use multiple Assets for spatially and temporally identical files. Assets need to match in time and geographic extent if they are placed in the same Item. Use different Items for files that differ temporally and geographically.
The JSON format provides flexibility to create multiple Items or Assets at one time. If there is variation in the temporal or spatial extent of the files, they typically should be organized into multiple Items with single Assets. At this time you cannot add additonal Assets to an existing Item, so you will need to create a new Item if you are adding to an existing STAC Collection.
[
  {
    "item_id": "",
    "assets": {
      "asset_1": "/vsiaz/href_to_cog_file.tif"
    },
    "item_date": "2022-01-01",
    "properties": {}
  }
]
item_id The name of the Item. Replace item_id with a new name or keep
the name in the template. Item names can be repeated or unique.
assets The asset(s) within an Item are where links to COG files should be
provided.
asset_1The name of the asset. Optional to replaceasset_1with a- descriptive name for your data. Navigator will use the asset name to query a set of COG files for a layer from a Collection. If you would
like your Layer in Navigator to pull multiple COG files into a single layer (such as a tiled dataset) make sure to give all assets throughout multiple Items the same name.
Replace
vsiaz/path/to/cog_file.tifwith the file path to your file in an Azure container. The files must be valid Cloud Optimized GeoTIFFs. The path should start with/vsiazand end with.tifFor example,``vsiaz/my-container/my-cog-file.tif`` If you have the file URL, remove the first half of the string up to and includingwindows.net. Optional to include additional Assets within the same Item or to create separate Items. Read more on STAC organization here.item_dateThe date for the files linked in the Item. Required to replace2022-01-01with year, month and day for your data. Only one date is permitted, therefore all assets in an Item should have the same date. Navigator will use this date range to query the Collection for the proper date range for your layer. For example, if a Collection contains 10 years of data organized into 10 Items, Navigator can create individual layers for each year by querying STAC for a date range within the Collection, as defined by the assets.
properties Optional to create custom properties for each Item to record
additional metadata in STAC. Note that STAC properties are not carried over to layer names, descriptions, dates, etc. in Navigator.
Tip
You can include,``”properties”: {“force”: true}`` in the Item JSON file if you need to override the COG validation. For example, you may need to add this property if your data is in COG format, but the COG validation from rasterio’s stac-rio plugin is returning errors if the minimum size of overviews is larger than 512. This field should only be used for warnings about the COG format and should not be used to add non-COG files to STAC, as those files will not work with the Navigator platform.
Once all properties are defined, click Save. If successful, a message will appear with a link to the layers admin in your workspace. Click on Create New Layer to use the data in Navigator.
If the JSON is not accepted into the STAC, an error message will return.
Troubleshooting
A red dot to the left of a line indicates an error in the JSON. You will not be able to submit your JSON until you fix the error. Common JSON errors include missing or extra commas, parentheses, or quotes.